Monday, January 31, 2011

Verlinden 1/15 PzKpfw Panzer III

by Artur Walchowski


Pz III -1/15 scale Verlinden production,after wash,remained chipping,dust and painting details.


Sunday, January 30, 2011

Dragon T-34/76 "Krasnoe Sormovo"

by Hamilkar Barkas


The kit is from Dragon (#6479) and belongs to the Smart Kit series, although it looks more like it is an old kit with some additional parts, so the term Smart Kit is not right in this case. Anyway, the quality of the kit is superb and the kit itself is quite beneficial. I had no problems to assemble the model, just a tiny amount of filler was needed on the gun mantlet.


The base-colour of the tank is a mixture of Revell Aqua Color 39 and 65. To depict a used paintwork on the tank i applied MIG dark wash and several sessions of drybrushing with a light base-colour. Some subtle chipping rounded off the work. The mud was done with a mixture of earth, white glue and MIG pigments.


I hope you like the finished model :)


Tuesday, January 25, 2011

Me-109F "Black 7"

by Dusan Lekic


Here is my latest build - Me-109F "Black 7" in 1/48th scale by Zvezda.

It is straight from the box with only added seatbelts from Eduard. The model has been painted with Gunze colors.
The markings are from the Eagle Strike "Barbarossa 3", aircraft known to have been flown by

Oblt. Helmut Meckel 2/JG3 (25 air victories).

I found some real interesting pictures about this aircraft and non standard camuflage in this great book "Jagdwaffe

Vol.3/Sec.2 Barbarosa The invasion of Russia Jun-Dec1941" .

Sunday, January 23, 2011

Doctor Cranky's in DA HOUSE

by Doctor Cranky


Greetings y'all! Actually no, Doctor Cranky is NOT in da house, he's in the Lab-RAT-ory!

It's great to be involved with this collaboration.

More soon, and keep up the energy and the talent, chaps!


Saturday, January 22, 2011

MiniArt 1/16 Praetorian Guardsman

by Hamilkar Barkas


Hello my friends :-)


This figure is from the Ukrainian manufacturer MiniArt. The quality is really bad, it is impossible to assemble the figure without using filler, but the figures are beneficial (12 €) and i like the motives that MiniArt offers.


This figure depicts a Praetorian Guardsman (# 16006) stationed near or in Rome in the 2nd century A.D. It is basically the same kit as the Roman Legionary i built several weeks ago. There is just a additional sprue included for the different type of helmet. I decided to replace the limbs to give the figure a different look, because the Praetorian would have the same pose as the previous Legionary.


I painted the figure with acrylic paints from Revell and Lifecolor and oil paints from MIG Production. Usually people would paint the Tunica of the Soldier with red paint but this time I decided to use a dark purple paint (inspired by the Praetorians appearing in the movie "Gladiator").
The included decal for the scutum of the Praetorian was very hard to handle, it is a very thick one and there is always the danger of cracking. I sealed the decal with Humbrol Decal Fix.


The whole project was some kind of training to improve my skills because i have four white metal figures from Pegaso in my storage and i want to paint them with some new techniques.


The Praetorian Guard (Latin: Prætoriani) was a force of bodyguards used by Roman Emperors. The title was already used during the Roman Republic for the guards of Roman generals, at least since the rise to prominence of the Scipio family around 275 BC. The Guard was dissolved by Emperor Constantine I in the 4th century.
The term Praetorian derived from the tent of the commanding general or praetor of a Roman army in the field—the praetorium. They were an elite recruitment of Roman citizens. It was a habit of many Roman generals to choose from the ranks a private force of soldiers to act as guards of the tent or the person. They consisted of both infantry and cavalry. In time, this cohort came to be known as the cohors praetoria, and various notable figures possessed one, including Julius Caesar, Mark Antony and Augustus (Octavian). As Caesar discovered with the Legio X Equestris, a powerful unit more dangerous than its fellow legions was desirable in the field. When Augustus became the first ruler of the Roman Empire in 27 BC, he decided such a formation was useful not only on the battlefield but in politics also. Thus, from the ranks of the legions throughout the provinces, Augustus recruited the Praetorian Guard.
The Guards began to play an increasingly ambitious and bloody game in the Empire. With the right amount of money, or at will, they assassinated emperors, bullied their own prefects, or turned on the people of Rome. (wikipedia)

Thursday, January 20, 2011

Mr. Scratch Mod

by Kasper Fischer


Rob Ferreira aka Mr. Scratch Mod just started a new series on his YouTube channel. He is new to YouTube and his videos are still a little rough around the edges but his skills are unprecedented... I have never seen the beauty of destruction, decay and rust replicated as fine as in his work. I'm really looking forward to see more work from his hands and some more great tutorials on YouTube. Right now he's working on a range target M4 Sherman.


Monday, January 17, 2011

Academy 1/48 MH-6 Attack Helicopter

by Kasper Fischer


This small scout chopper was an really easy and fast build. The Academy kit is an old but very good kit and I can only say good things about it. It is very cheap and Academy has a lot of different versions available. Every thing comes together very well and no real problems worth mentioning. I still have some problems dealing with the clear parts but that's what this is all about. Practice...


Friday, January 14, 2011

Tamiya 1/48 Vought F4U-1A Corsair

by Tõnis Kuus


Ok i'll start then.This is my model of the Tamiya 1/48 F4U-1A Corsair. This model is made as a heavy weathered aircraft and made to sit on a on a runway somewhere in the pacific. The pit has the Eduard photo etch set.


Thursday, January 13, 2011

Dynasty Models 1/9 U.S. 82nd Airborne

by Dino Krafczyk

Okay, this is my first attempt ever to write for a blog. I hope I don't screw up too bad.. ;)

I found this nice resin bust of an U.S. paratrooper in the special offers corner of my local hobby shop. Normally resin products, especially that large, are quite expensive, but I got this one for 2€ - too good to be true!! It was made by Dynasty Models, a korean company, and the quality is superb. I like the expression on the guy's face. Somewhat heroic and somewhat ticked off..


First I washed the resin with a mild soap and lukewarm water. There are chemicals or something in the resin that will make the paint come off very easily if you don't wash it first!

Then I painted the face. Normally I would have started with a light flesh tone enamel base colour, but the bust comes in the typical, light beige resin tone that is just perfect. I applied a rather thick coat of a good quality burnt sienna oil colour and immediately began to carefully wipe it off again with a wide sable brush, cleaning the brush with a piece of tissue paper between wipes. The most important thing with this technique is to not use any thinner or turpentine on the brush!!! Otherwise there will be just a big mess.


When done correctly, the oil paint will leave only a subtle and transluscent coat on the raised areas of the face where the base colour will show through and it will stay dark and opaque in the recessed areas. After that the face should already look quite impressive and have a lot of depth. After drying (which may take a long time!) I painted the beard shadow with a subtle coat of dark umber oils, let that dry, and then followed a very careful drybrush run with a flesh tone. The cheek bones were painted with the most subtle coat of red oil paint and can barely be seen, but that's exactly what I wanted. The same red colour was used for the lips.


As you can see, I use the word "subtle" a lot. The steps I discribed above can easily be overdone and then the face will look scruffy or like a clown! So subtlety is the key to success..

After having painted the eyes, eyebrows and hair the face was finished and I painted the uniform and the helmet using enamel colours. For the uniform I used a light khaki tone and the shading was done with olive drab oil colour that I mixed with white to match the tone of the khaki. Since the bust is quite a large scale I used less contrast than I would on a figure in 1/35 or 1/72. Then followed a drybrush with a lighter khaki tone and the details were painted. The helmet was done using dark olive drab, drybrushed with a light olive tone.

That was my first time to paint something in a large scale and I'm very pleased with the end result. I hope I could give you some hints on how to paint a face with oil colours and maybe you wanna try it yourself. I only wish I would have taken some pictures during the painting process.

Maybe next time... :)

Wednesday, January 12, 2011

Academy 1/48 MH-6 Attack Helicopter

by Kasper Fischer

It feels awesome to be back in the workshop and I'm almost done with the next project.

I started the next project straight away and I will properly complete it tomorrow. It's a small 1/48 scale black attack helicopter from Academy. A really easy model without too many problems, though it seems I really got some issues with the clear parts in general. When I have done this one I will move straight on to my Apache so this little scout chopper was execellent practice. I am really looking forward to the Longbow...


Tuesday, January 11, 2011

Rest Models 1/32 Macedonian Phalangite

by Hamikar Barkas


This is a resin figure from Rest Models(Ukraine). It is the best resin figure in 1/32 scale i have ever seen! Great details, good quality and beneficial. I just had to add the middle part of the pike myself. Rest Models has a lot of other interesting figures in its program, i will try to get another figure in the next time.


The Macedonian Phalangites (pezhetairoi or foot companions) formed the main heavy infantry force of the Macedonian Army. These soldiers were equipped with a very long pike (sarissa), a short sword and a rimless shield hanging from the shoulder to fight in the distinctive Macedonian variant of the greek phalanx. The sarissa bearing phalanx would usually march to battle in open formation to facilitate movement. Before the charge, it would tighten its files to close formation or even compact formation (synaspsimos). The tight formation of the phalanx created a "wall of pikes", and the pike was so long that there were fully five rows of them projecting in front of the front rank of men—even if an enemy got past the first row, there were still four more to stop him. The back rows bore their pikes angled upwards in readiness, which served the additional purpose of deflecting incoming arrows. The Macedonian phalanx was considered invulnerable from the front, except against another such phalanx; the only way it was ever generally defeated was by breaking its formation or outflanking it.


Monday, January 10, 2011

Dragon 1/72 M3A2 Bradley


by Kasper Fischer


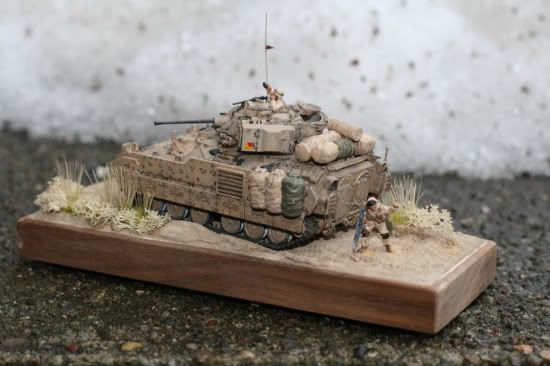
Well, it has really been a long time since I touched a model last but yesterday I pulled myself together and finished the Bradley diorama. It is in no way perfect but, again, I really learned a lot from this build. This was my first diorama ever and my first figures since I was 8 years old. I'm really satisfied with the ground work and I like the look and colour of the diorama base. I had big problems with the pin wash because I didn't use satin vanish and it really shows and painting 1/72 scale figure was a bit of a challenge too but I think they turned out ok. Not great but I'm sure I'll do better next time around.

Photobucket


Related Posts Plugin for WordPress, Blogger...