Showing posts with label Miniatures. Show all posts

Wednesday, April 18, 2012

"Battle of Mylae" 260 B.C. in 1/72 scale

by Michael Rieß


I have depicted a fight between a Carthaginian and a Roman trireme at the Battle of Mylae in 260 BC, in this diorama. Roman soldiers are storming across their boarding bridge (lat. corvus, engl. raven) for a direct assault on the enemy ship. The Battle of Mylae took place in the First Punic War, it ended with a Roman victory.

I used two Trireme kits and several packages of figures from Zvezda for this big project.


The first video is about the construction of the ships and the planning of the diorama. I show you all the different kits and figures I used in the build. I also share some of my knowledge of the ships and their use, in a historic context.


In the second video I give you a close up of the figures.


The third video is about the construction of the diorama. I don't have a lot of experience with water effects and I'm not completely satisfied with the result but I learn by trying and this was a fun project. 


Tuesday, April 3, 2012

German Stormtrooper, 1916.

By Michael Rieß


I was in the mood to paint another bust, this time a German soldier on the Western Front in 1916.
The bust has a very special look, which is rather shocking than nice, and i tried to keep that look of a desperate soldier. You can see the pain in his face, he knows he is already a dead man.
Painting this bust really made me thinking and i hope i can share my feelings with you through the video down below.

I painted the bust with acrylic paints from Revell, for the shading i used oil paints. Some MIG pigments were used for weathering.
The base is selfmade.


Monday, July 11, 2011

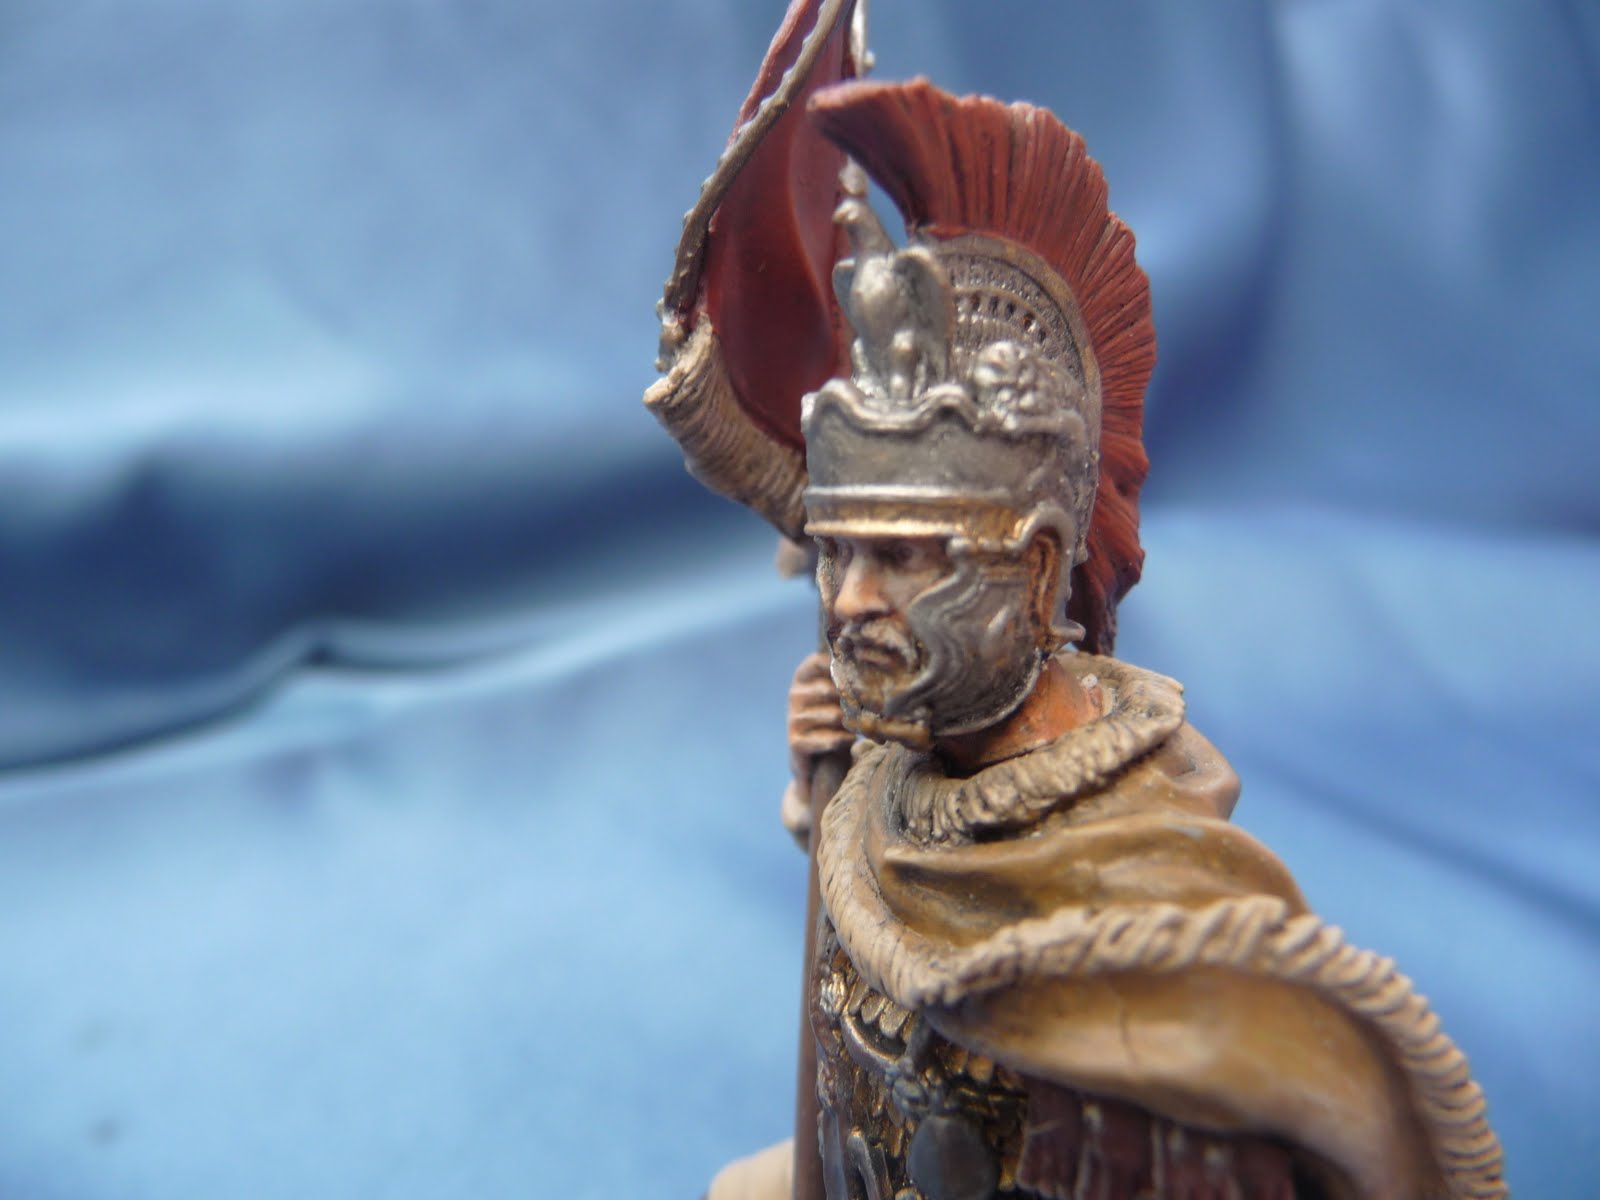
Roman cavalry Vexillifer, 3rd century A.D.

by Michael Rieß


The figure shows a Vexillifer (standard bearer) of the Roman cavalry in the 3rd century A.D. He wears scale armor and a very elaborate helmet, which was probably worn for parades only.

This is my second 54mm (1/32 scale) white metal figure from the Italian producer "Soldiers". The details are superb and i enjoyed painting the figure. I used acrylic paints from Revell and Lifecolor and oil paints from 502 Abteilung.


Friday, July 1, 2011

Decurio Equitum 3rd century A.D.

by Michael Rieß


This white metal figure in 75mm scale is from Pegaso Models. The quality of the kit is superb.

I painted the figure with acrylic paints from Revell and Lifecolor. Oil paints were used for the shading.

The kit includes a small base, showing a Roman cobblestone street. I replaced it, because the base was too small in my opinion. I made a bigger one using an old picture frame, modelling clay, earth and green stuff from Fredericus Rex (Green line). I used no pigments or other weathering techniques here.


Saturday, June 4, 2011

Warhammer tutorial | How To Paint Ork's


Lester Bursley from Awesomepaintjob.com has just released an ALL new tutorial. He is a skilled artist and even though you might not be interested in Warhammer or Sci-Fi, Les still got a lot to offer and everybody can learn from this guy. 

This time it's an Ork that's on the workbench. 

Monday, May 9, 2011

Marcomannic warrior, Pegaso Models 75mm

by Michael Rieß


Pegaso Models offers various white metal figures with excellent quality, and this figure is no exeption. Some filler was needed around the shoulders, but this is quite normal and no problem.

I painted the figure with acrylic paints from Revell and Lifecolor. Oil paints from Abteilung 502 were used for the shading.

The plants on the base are from Busch and Fredericus Rex.
I used MIG pigments to depict some mud on the base

The figure depicts a Marcomannic warrior during the Marcomannic wars (166-182 A.D.). He looted the corpses of some dead Romans, that´s why he carries a Roman Pugio dagger and a Roman helmet. Loot was usually sacrificed to the gods or used in battle again.


Monday, February 21, 2011

Pegaso Models 75mm Hannibal Barkas

by Hamilkar Barkas


This figure depicts the great Carthagenian Commander Hannibal Barkas at the crossing of the Alps in 218 BC. I painted the figure with acrylic paints from Revell and Lifecolour, the shadings were done with Abteilung 502 oilpaints. The snow on the base is a very fine powder called "magic snow". I mixed it with water and white glue and applied it on the base. Then I added some dryed green stuff to complete the base of the figure.


Wednesday, February 9, 2011

Dragon 1/16 German Panzerjäger

by Vladimir Paraskeva


I rarely build large figures, but this was given to me for my birthday, a couple of years ago. I started the assembly last year, but has lost some important details and all work stopped for about a year. I liked the kit, though it should be noted is not a sufficient clarity of some parts. The figure was painted with Revell enamel, clear-coated with matt varnish from Testors. The weathering was done with pastels from Tamiya and Mr.Hobby(set 1).


Monday, February 7, 2011

Pegaso Models 75mm Hernan Cortes

by Hamilkar Barkas


This figure depicts the conquistador Hernan Cortes during his campains in the new world in the 16th century. The white metal kit is from Pegaso Models in 75mm scale. The assembly was very easy, all parts are glued together with instant glue. I started the painting of the figure with a light grey basecoat. I painted the face with acrylic paint from Lifecolor and oilpaints from MIG afterwards. The rest of the clothes and armor was painted step by step with revell acrylic paint and oilpaints again. I applied no pigments or any other weathering, because the figure looks so majestic and the pose is so powerful.


Saturday, January 22, 2011

MiniArt 1/16 Praetorian Guardsman

by Hamilkar Barkas


Hello my friends :-)


This figure is from the Ukrainian manufacturer MiniArt. The quality is really bad, it is impossible to assemble the figure without using filler, but the figures are beneficial (12 €) and i like the motives that MiniArt offers.


This figure depicts a Praetorian Guardsman (# 16006) stationed near or in Rome in the 2nd century A.D. It is basically the same kit as the Roman Legionary i built several weeks ago. There is just a additional sprue included for the different type of helmet. I decided to replace the limbs to give the figure a different look, because the Praetorian would have the same pose as the previous Legionary.


I painted the figure with acrylic paints from Revell and Lifecolor and oil paints from MIG Production. Usually people would paint the Tunica of the Soldier with red paint but this time I decided to use a dark purple paint (inspired by the Praetorians appearing in the movie "Gladiator").
The included decal for the scutum of the Praetorian was very hard to handle, it is a very thick one and there is always the danger of cracking. I sealed the decal with Humbrol Decal Fix.


The whole project was some kind of training to improve my skills because i have four white metal figures from Pegaso in my storage and i want to paint them with some new techniques.


The Praetorian Guard (Latin: Prætoriani) was a force of bodyguards used by Roman Emperors. The title was already used during the Roman Republic for the guards of Roman generals, at least since the rise to prominence of the Scipio family around 275 BC. The Guard was dissolved by Emperor Constantine I in the 4th century.
The term Praetorian derived from the tent of the commanding general or praetor of a Roman army in the field—the praetorium. They were an elite recruitment of Roman citizens. It was a habit of many Roman generals to choose from the ranks a private force of soldiers to act as guards of the tent or the person. They consisted of both infantry and cavalry. In time, this cohort came to be known as the cohors praetoria, and various notable figures possessed one, including Julius Caesar, Mark Antony and Augustus (Octavian). As Caesar discovered with the Legio X Equestris, a powerful unit more dangerous than its fellow legions was desirable in the field. When Augustus became the first ruler of the Roman Empire in 27 BC, he decided such a formation was useful not only on the battlefield but in politics also. Thus, from the ranks of the legions throughout the provinces, Augustus recruited the Praetorian Guard.
The Guards began to play an increasingly ambitious and bloody game in the Empire. With the right amount of money, or at will, they assassinated emperors, bullied their own prefects, or turned on the people of Rome. (wikipedia)

Thursday, January 13, 2011

Dynasty Models 1/9 U.S. 82nd Airborne

by Dino Krafczyk

Okay, this is my first attempt ever to write for a blog. I hope I don't screw up too bad.. ;)

I found this nice resin bust of an U.S. paratrooper in the special offers corner of my local hobby shop. Normally resin products, especially that large, are quite expensive, but I got this one for 2€ - too good to be true!! It was made by Dynasty Models, a korean company, and the quality is superb. I like the expression on the guy's face. Somewhat heroic and somewhat ticked off..


First I washed the resin with a mild soap and lukewarm water. There are chemicals or something in the resin that will make the paint come off very easily if you don't wash it first!

Then I painted the face. Normally I would have started with a light flesh tone enamel base colour, but the bust comes in the typical, light beige resin tone that is just perfect. I applied a rather thick coat of a good quality burnt sienna oil colour and immediately began to carefully wipe it off again with a wide sable brush, cleaning the brush with a piece of tissue paper between wipes. The most important thing with this technique is to not use any thinner or turpentine on the brush!!! Otherwise there will be just a big mess.


When done correctly, the oil paint will leave only a subtle and transluscent coat on the raised areas of the face where the base colour will show through and it will stay dark and opaque in the recessed areas. After that the face should already look quite impressive and have a lot of depth. After drying (which may take a long time!) I painted the beard shadow with a subtle coat of dark umber oils, let that dry, and then followed a very careful drybrush run with a flesh tone. The cheek bones were painted with the most subtle coat of red oil paint and can barely be seen, but that's exactly what I wanted. The same red colour was used for the lips.


As you can see, I use the word "subtle" a lot. The steps I discribed above can easily be overdone and then the face will look scruffy or like a clown! So subtlety is the key to success..

After having painted the eyes, eyebrows and hair the face was finished and I painted the uniform and the helmet using enamel colours. For the uniform I used a light khaki tone and the shading was done with olive drab oil colour that I mixed with white to match the tone of the khaki. Since the bust is quite a large scale I used less contrast than I would on a figure in 1/35 or 1/72. Then followed a drybrush with a lighter khaki tone and the details were painted. The helmet was done using dark olive drab, drybrushed with a light olive tone.

That was my first time to paint something in a large scale and I'm very pleased with the end result. I hope I could give you some hints on how to paint a face with oil colours and maybe you wanna try it yourself. I only wish I would have taken some pictures during the painting process.

Maybe next time... :)

Related Posts Plugin for WordPress, Blogger...